


Install Klipper on a Raspberry Pi Zero 2

Klipper Needs Linux
Running Klipper on your 3D printer requires a Linux server connected to your controller board. The Raspberry Pi Zero 2 is a great choice. It's cheap, tiny, has in-built WiFi and uses hardly any power. There are some downsides of course, but we can work past those. Here's the plan:
- Install Linux onto Pi Zero 2
- Download a RAM upgrade (really!)
- Use the KIAUH script to install Klipper and its components onto the Pi Zero 2
- Install Klipper onto your 3D printer controller
- Connect the Pi Zero 2 to your 3D printer controller
1. Install Linux onto your Pi Zero 2
We're going to do this manually. There are a few different pre-built images out there, including the excellent MainsailOS, which is worth a try if you get stuck. I think it's worth learning how the various parts fit together, and the install script we'll use makes it fairly painless anyway.
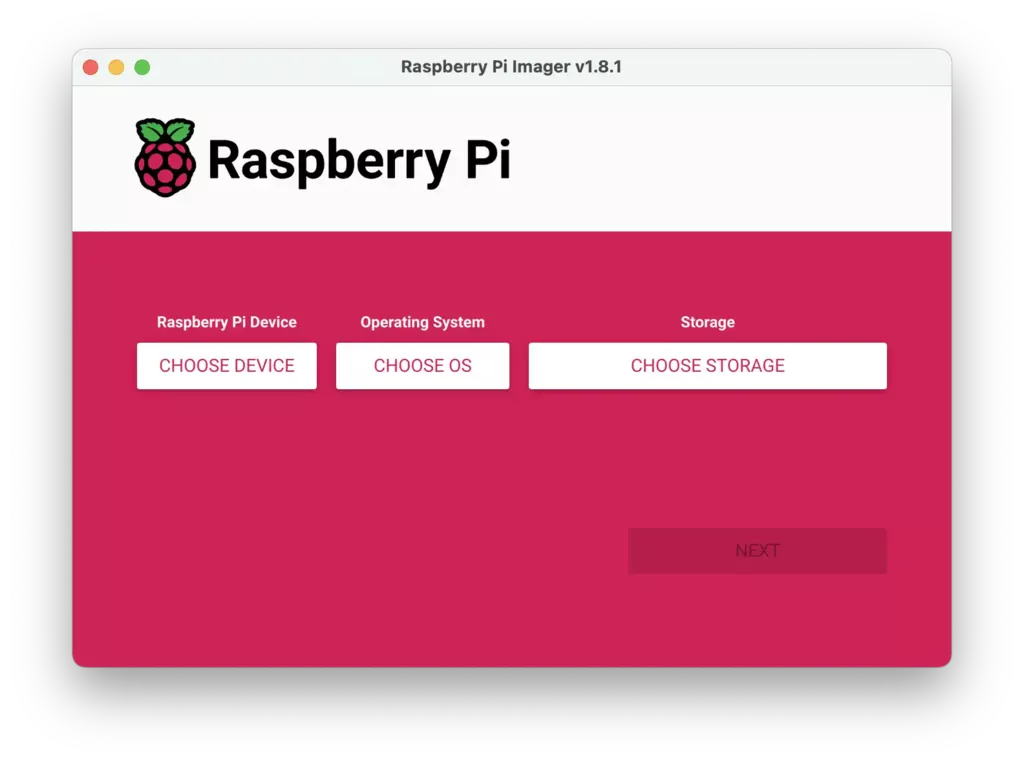
Download the Raspberry Pi Imager from the software section of the Raspberry Pi website. It's a easy to use GUI app and it available for Linux, Mac OS X, and Windows.
Plug the micro-SD card you're doing to use into your computer.
Press the Choose OS button and select Raspberry Pi OS Lite (64-bit) from the other sub-menu. Double check that you have selected Lite and 64-bit.
Configure Before Writing
The best feature of the Raspberry Pi Imager is the ability to configure your image before you write it onto your micro-SD card. Press the gear icon, and get your setup done now. This way, you'll never need to plug your Pi Zero 2 into a monitor or a keyboard.
- Set the hostname. You'll use name this to connect to it over WiFi.
- Enable SSH, allow passwords.
- Set a user name and password.
- Configure your WiFi.
SSH into the Pi Zero 2
Write the image to your micro-SD card. Plug it into your Pi Zero 2 and power it up. If you got your settings right, you should be able to SSH into your newest little Linux server after two or three minutes or so of automated setup, during which the activity LED will flash away merrily. Let's SSH to it:
$ ssh leon@printy.local
leon@printy.local's password: *********
$ uname -a
Linux printy 6.6.20+rpt-rpi-v8 #1 SMP PREEMPT Debian 1:6.6.20-1+rpt1 (2024-03-07) aarch64 GNU/Linux
$ sudo apt update
...
$ sudo apt full-upgrade
...
$ echo 'Victory!'
Victory!
Be sure to use your own username and hostname here, of course. It's always a good idea to manually upgrade your system's software as soon as possible after an install too.
2. Download a RAM upgrade
The Pi Zero 2 has more CPU power than we need, but its RAM is a little lacking, especially when also running a camera. It does have enough for usual operation, but can run out during the various setup tasks we're about to undertake. The 32-bit install uses less RAM, but we're using the 64-bit version because it runs much faster, unless you run of of memory of course.
It's been a meme since the 1990s, but you can actually download a RAM upgrade. Chromebooks do it all the time using ZRAM. It creates a swap partition in RAM, to which memory is only allocated as-needed, so it costs us practically nothing during normal operation. You don't have to do this step, but when I didn't I ran into a nasty swap storm while building zeroconf during the Klipper install.
$ sudo apt install git
...
$ git clone https://github.com/foundObjects/zram-swap
...
$ cd zram-swap
$ sudo ./install.sh
We'll take a look at how this ZRAM upgrade performs after the next step.
3. Try and Pronounce KIAUH!
Layers Upon Layers
We're going to use use the KIAUH (Klipper Installation And Update Helper) helper script to download and install the various pieces of software that a complete Klipper installation needs.
Now is a good time to talk about layers. The full Klipper ecosystem consists of many layers of software running on three different computers: the 3D printer controller board, the Raspberry Pi Linux server connected to it, and the web-browser on your desktop. Klipper itself is split into two parts, as we can see below.
- Klipper on your 3D printer microcontroller board. The firmware - a small and fast C program that actual moves your stepper motors and turns your heaters on and off. Runs the time-stamped commands received from by the other half of Klipper precisely on schedule.
- Klipper on your Raspberry Pi. A large and smart Python program. Interprets GCODE, plans out future movements, and sends commands to first layer over a serial data link.
- Moonraker is the webserver back-end that talks to the 2nd layer of Klipper and serves up the webclient.
- The top-most layer is the webclient that runs on your desktop or laptop. There are two in common use, Mainsail and Fluidd. I might get flamed for saying so, but they're pretty much the same.
Install Klipper and Moonraker
We are going defer installing layer one for now, and will start by installing layers two and three first, using the KIAUH script.
$ cd
$ git clone https://github.com/dw-0/kiauh.git
$ cd kiauh/
$ ./kiauh.sh
From the on-screen menu choose option one and follow the steps to install one instance of Klipper running under Python 3. The first time you do this it has to download loads of new software and will take several minutes.
Once that has finished, use the menu to install Moonraker. This is the webserver back-end that sits between Klipper and the webclient that you'll soon be using.
Install Your Webclient: Mainsail or Fluidd
It is time to choose which web client you want to install. I've used them both and they're both great, but I probably lean towards Mainsail. Go ahead and try them both if you like. Follow the steps on the KIAUH install screen.
Once that has finished installing, load up the webclient using the hostname you chose earlier, eg. http://printy.local/
If the hostname doesn't work, try the printer's IP address. You find it by running command ip addr on the Pi Zero 2.
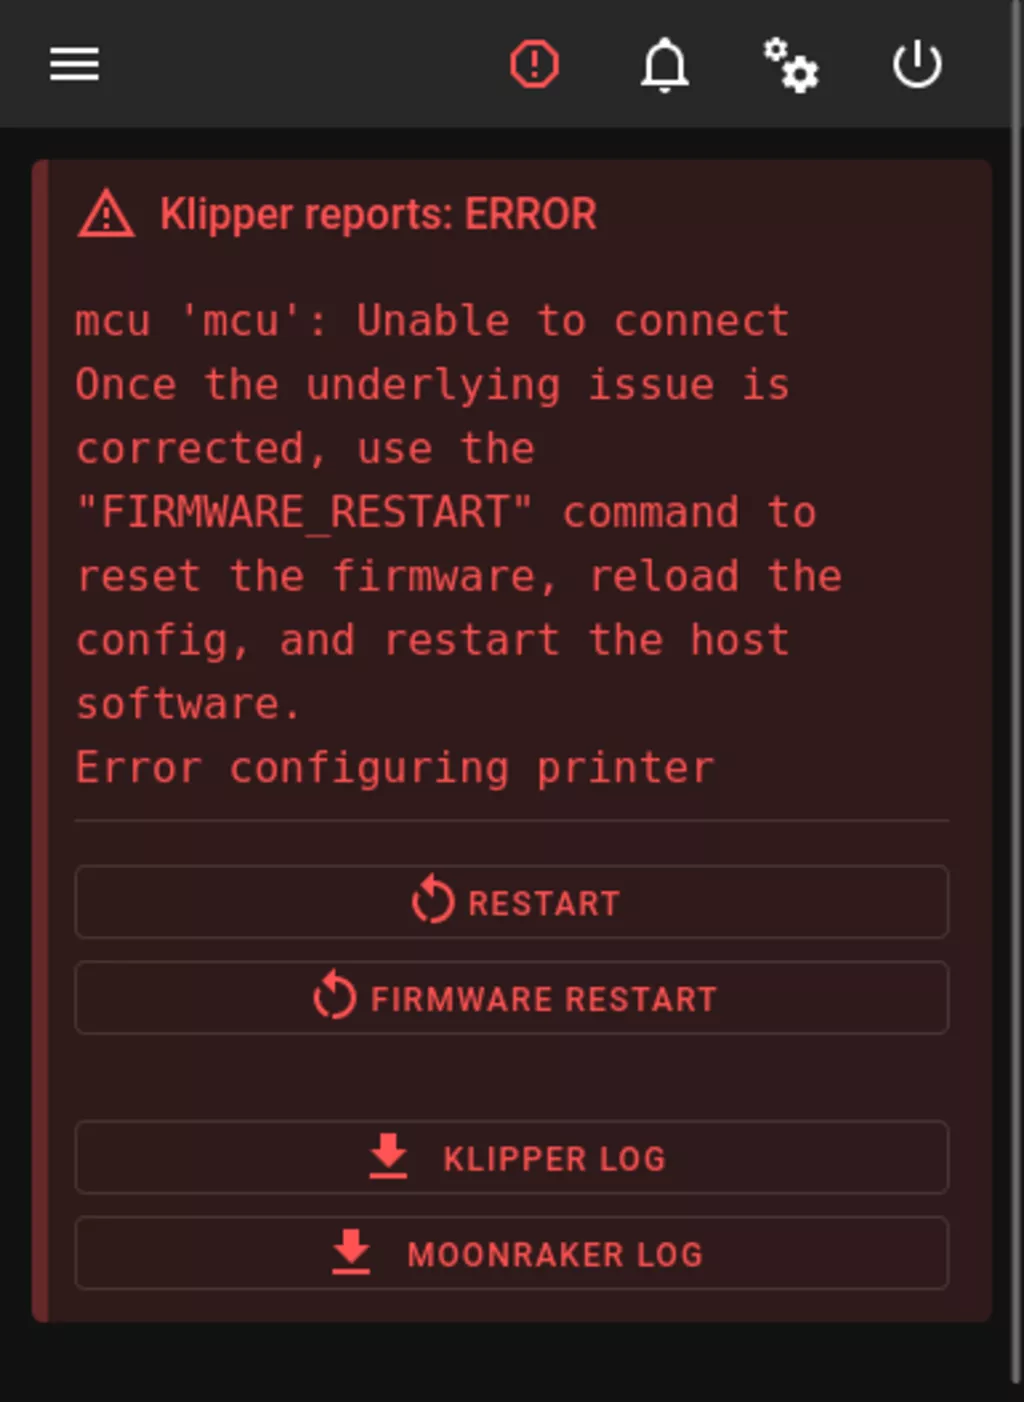
Hopefully you'll see the pictured error message. Doing so confirms that layers 2, 3, and 4 are all working properly. The message complains that layer 2, the Linux half of Klipper, can't talk to layer 1, the microcontroller half of Klipper.
We haven't installed layer 1 yet, so that is what we expect (and hope!) to see at this point.
Did ZRAM Help?
This initial install of Klipper and Moonraker is pretty intense. Lots of software gets downloaded, installed, and sometimes even compiled from source. I ran another terminal window to see how our ZRAM-power memory upgrade performed. Memory pressure today wasn't as high as it was when I first documented these steps (I had to build my own zeroconf wheel that time), but was still high:
$ free -h
total        used        free      shared  buff/cache   available
Mem:           417Mi       311Mi       102Mi          0B        53Mi       105Mi
Swap:          621Mi       189Mi       432Mi
$ zramctl
NAME       ALGORITHM DISKSIZE   DATA COMPR TOTAL STREAMS MOUNTPOINT
/dev/zram0 lz4         521.3M 193.7M   87M   91M       4 [SWAP]
The output of the zramctl command shows one swap device, utilising all four CPU cores and LZ4 compression, with a maximum size of 521MB. The three most important columns show 194MB of data stored, compressed to 87MB, using a total of 91MB of physical RAM including overhead - a compression ratio of more than two times. Not bad!
4. Install Klipper onto 3D Printer Board
Remember how we skipped layer 1 of our Klipper stack earlier? It's time to handle that now. We're
going to configure and build the firmware that runs on your 3D printer
microcontroller board on the Raspberry Pi, then install it onto that
board.
The options and steps to do these two things vary wildly depending on which board your printer uses, but I hope by now you'll understand how everything fits together, and it won't be too frustrating to figure out.
At the top of this page is pictured the BigTreeTech SKR Pico v1.0, which is the board I'll use as I run through the steps required to get the Klipper firmware installed and talking to the Pi Zero 2. It costs less than USD$30 and comes with very convenient physical and electrical connections for the Pi Zero 2. You can use any board you like, however. I've used these same steps to connect to the larger BTT SKR 1.4 Turbo.
Configure and Build Klipper Firmware
From the KIAUH menu choose option 4, Advanced, then option 2, Build Firmware.
After a couple of checks you'll see something like the following image, Klipper's firmware configuration menu.
We use this menu to tell the build system which 3D printer microcontroller board we have, and how that board should talk to the Linux half.
The BTT Pico uses the RP2040 micro and its included cable is set up for UART serial on GPIO pins 0 and 1, which I've selected.
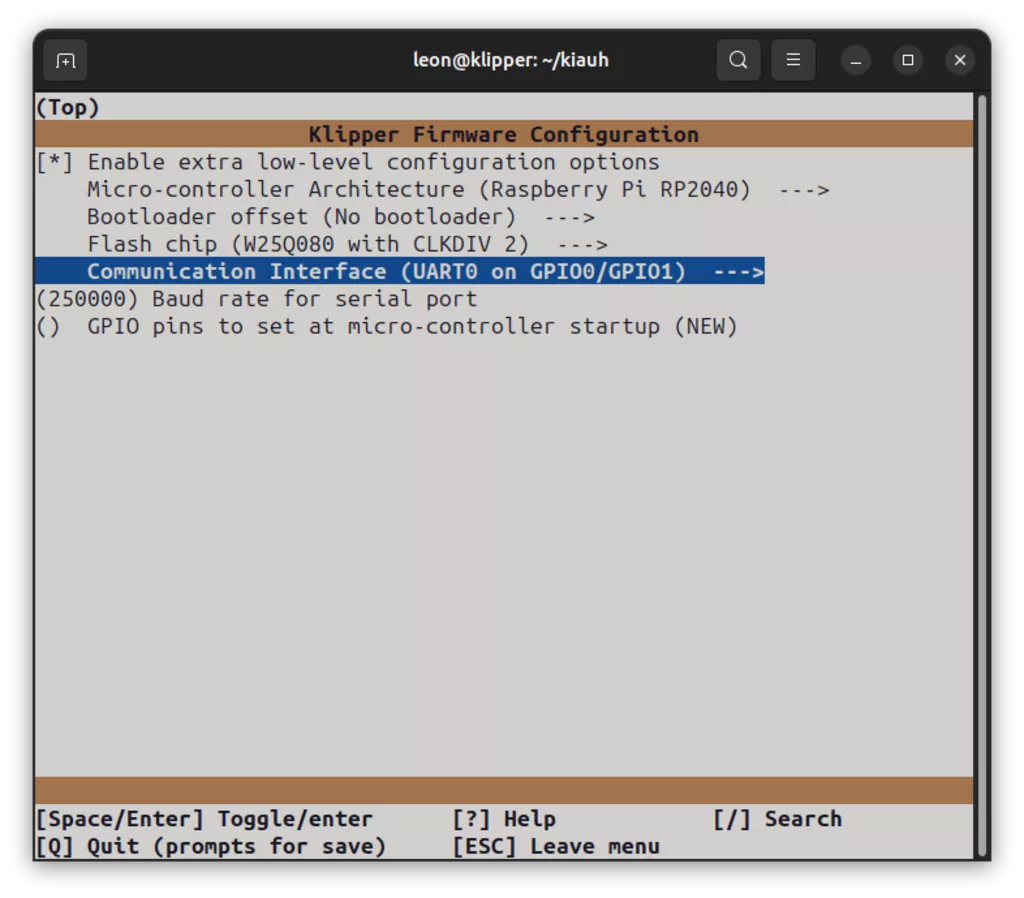
A quick google for 'klipper config your board' will get the information you need. If you're using a USB cable from a larger Raspberry Pi board, choose USB Serial for your communication interface. Press escape to leave the menu and KIAUH will build the firmware for you.
Download Klipper Firmware
Leave the menu and find the firmware file. Its name will vary depending on which board you built it for, but you can always find it in the same folder. My SKR Pico board uses a uf2 file:
$ cd ~/klipper/out/
$ ls -lh
...
-rw-r--r-- 1 leon leon 65K Apr 27 14:05 klipper.uf2
...
Most of the time you'll need to copy the firmware file to your desktop in order to follow the board manufacture's instructions and install it. You could copy it over the network using scp but it's even quicker to use Python and run a temporary webserver in that folder:
$ cd ~/klipper/out/
$ python3 -m http.server
Serving HTTP on 0.0.0.0 port 8000 (http://0.0.0.0:8000/) ...
192.168.0.10 - - [27/Apr/2024 14:15:01] "GET / HTTP/1.1" 200 -
192.168.0.10 - - [27/Apr/2024 14:15:35] "GET /klipper.uf2 HTTP/1.1" 200 -
Visit http://printy.local:8000/ on your desktop to view the file listing and download your firmware file. Don't forget to specify port 8000. If you forget you'll get the main webserver running on the default port 80 and will just see the Mainsail error message again.
Install Klipper Firmware
Every 3D printer microcontroller board seems to have a different approach to installing firmware. The SKR Pico requires a USB connection and a jumper to be set. Others require that you give the firmware a specific name and copy it onto an SD card. This step is very much RTFM for your board. Sorry!
5. Are the Two Halves of Klipper Talking?
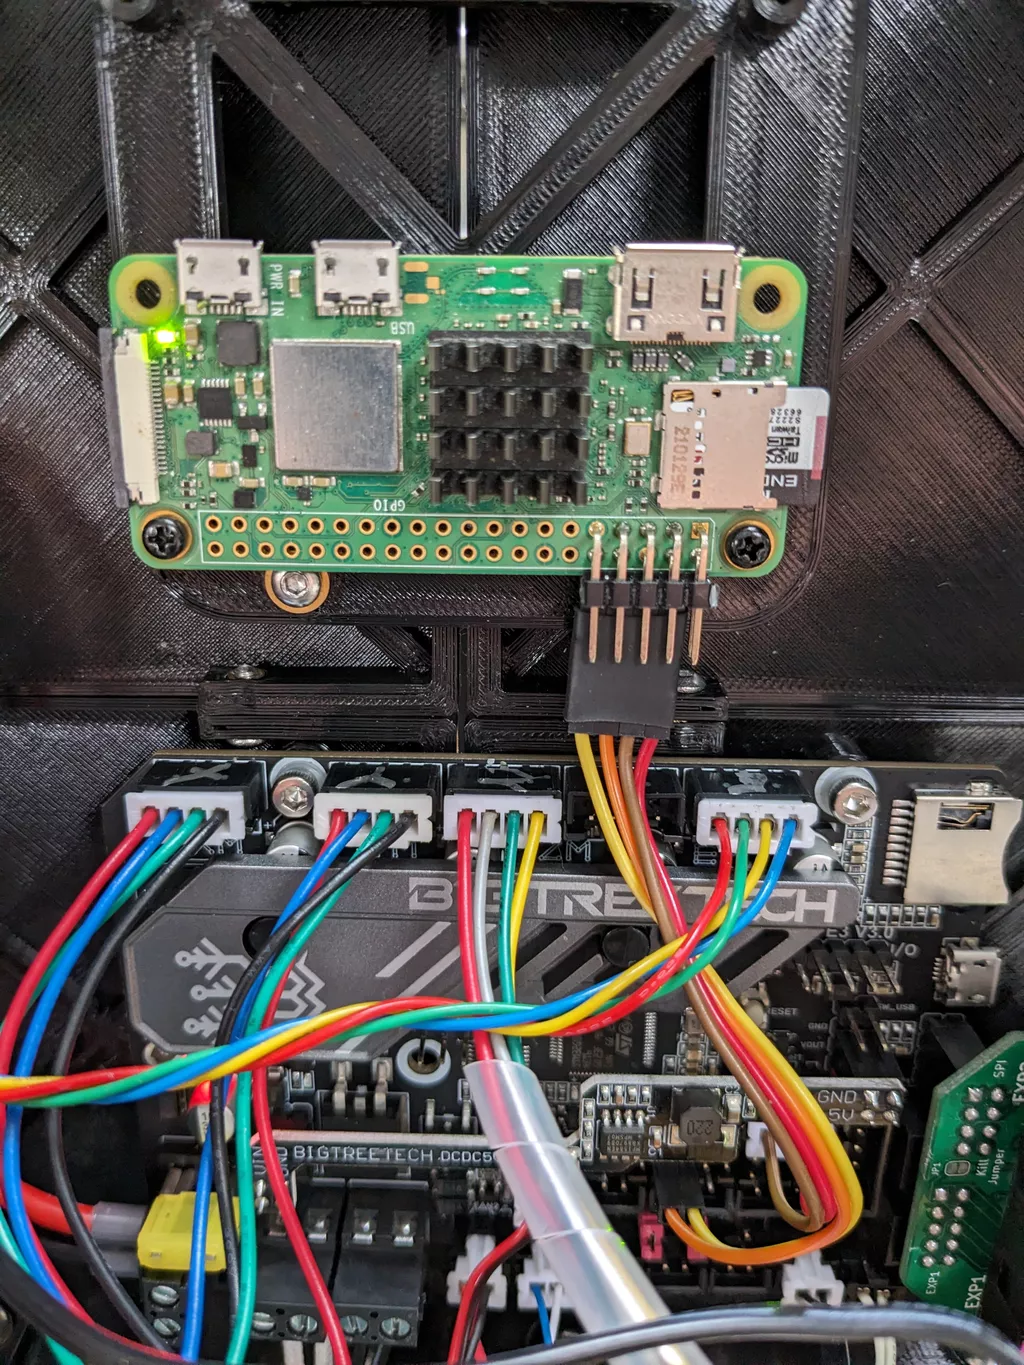
Once the firmware is running on the 3D printer board you need to take care of the physical connections. Both boards need power, and you need a communication link between the two. Take another look at the SKR Pico setup that I've got running on the bench here, for this article, and in preparation for a upcoming delta printer build I have planned.
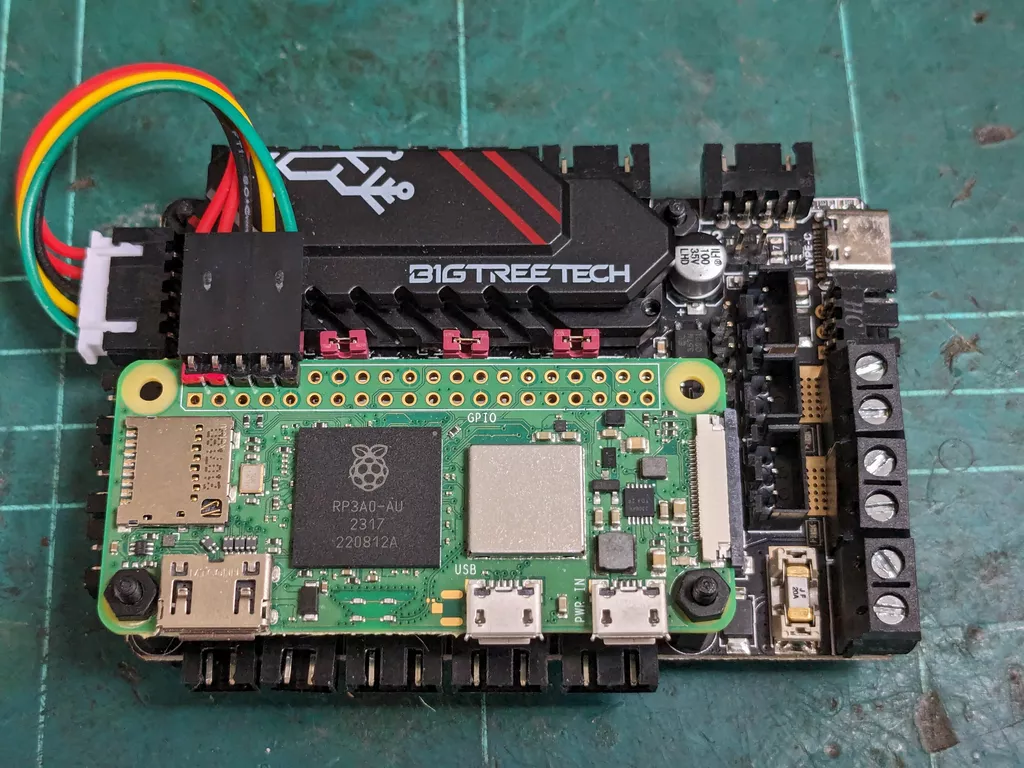
You can see that I've soldered on five header pins onto the GPIO header on my Pi Zero 2 and used a red paint marker to remind me which are the 5V pins. The cable comes with the SKR Pico board and powers the Raspberry Pi over the red and black wires. Yellow and green form the UART serial connection. It's very neat and tidy.
Here's another Pi Zero 2 setup that is not so neat.
Pictured is the underside of the Rook 2020 printer that I built last year. I'm using GPIO pins 14 & 15 on the Pi as a serial connection between the boards, but my header pins are not so neat, and I had to build my own cable.
This printer uses another BigTreeTech board, the E3 Mini v3. Its onboard 5V regulator is a bit underpowered, so I'm using the manufacturer's 5V daughter board that was originally intended to drive coloured LED strips.
While not as neat and tidy as the Pico, it's been running flawlessly for almost a year now.
USB or Serial?
Another option is to use ordinary USB cables to connect the two boards. The form-factor of the Pi Zero makes this tricky, so I don't use it here, but there are no downsides to this approach. People talk a lot of about the differences in latency, bandwidth, and reliability between the two approaches, but there is little practical difference.
The movement commands that the Klipper in layer two sends to Klipper firmware in layer one contain the exact time when they should be scheduled to run, and are buffered several seconds in advance. As long as that buffer never gets empty, none of the debate about latency matters.
A New Error Message!
If you revisit your new printer's Mainsail (or Fluidd) webclient you will hopefully now have a new error message. Which one depends on how many of the printer's sensors you have connected. At a minimum you need to have its thermistors connected, otherwise Klipper firmware will refuse to run.
6. Configure Klipper
That's the end of this tutorial, you're now on your own!
Configuring Klipper is either a never-ending adventure, or a huge pain in the ass - depending on your point of view. The good news is that you can configure it right from your webclient, no firmware rebuilding required. A good place to start is the official list of example configs, and you should keep a copy of the Klipper documentation open in a tab somwhere too. Good luck!
Published 21 Apr 2024